Introduction to Digital Images
In this section we'll look at how digital images work. (Hat tip to Mark Guzdial and Barbara Ericson for promoting the media computation idea of using images, sounds etc. to introduce computers.)
Digital Images
You see images on computers all the time. Here we will look behind the curtain, seeing how images are put together. What looks like a whole image to us, in the computer is a structure made of many little numbers.
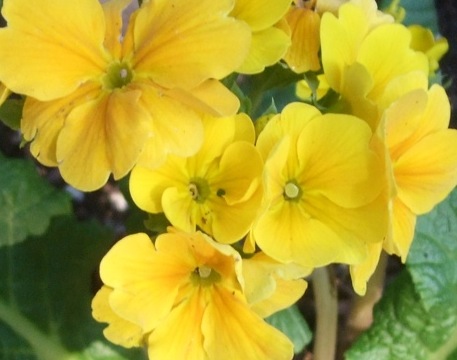
Here is an image of some yellow flowers:
Zoom In - Pixels
Zooming in on the upper left flower, we can see that it is actually made of many square "pixels", each showing one color.
- Each pixel is a small square that shows a single color
- An 800 x 600 image is 800 pixels wide by 600 pixels high, 480,000 pixels in all (0.5 megapixels)
- Digital cameras today produce images with several megapixels per image, say 8000 x 6000 for about 5 megapixels
We will not work with individual x/y coordinates too much. You just need to appreciate that there is this x/y coordinate system, so that every pixel in an image has some x/y coordinate that identifies its location within the image grid.
Image Diagram
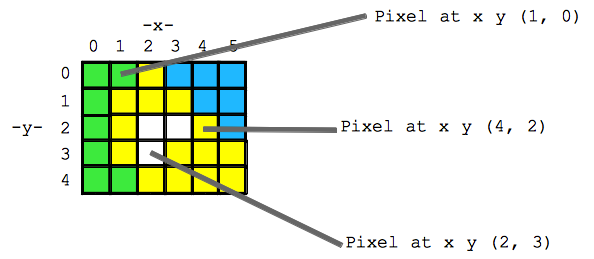
- The pixels are organized as a grid, identifying each by an (x, y) coordinate, so every pixel can be identified by its (x, y) address
- x=0, y=0 is the upper left -- aka (0, 0) the top left pixel of the whole image
- x=1, y=0 is the pixel 1 to the right -- aka (1, 0)
- x=2, y=0 is the pixel 1 more to the right -- aka (2, 0) -- still in the top row
- How is the color of each pixel encoded?
Aside - Newton's Color Prism
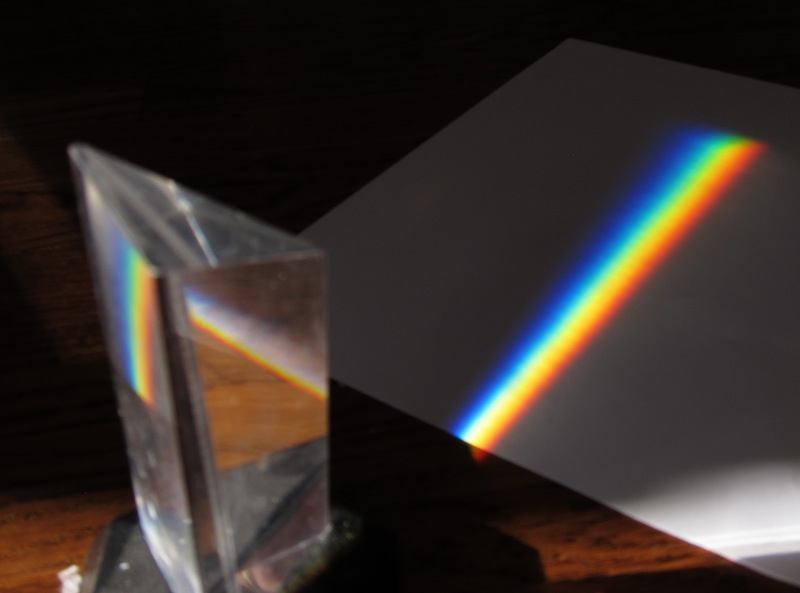
Sir Isaac Newton did the famous prism experiment, showing that white light is made up of a spectrum pure colored light. Here is a picture of the experiment on my floor. White sunlight is coming in from the left into the glass triangular prism which splits up the light. Coming out of the prism we have a continuous range of pure colors, and a few are picked out by name: red, orange, yellow, green, blue, indigo, violet (ROY G BIV).
Funny story: why add "indigo" in there, instead of just leave it at blue? Reflecting the mysticism of his time, Newton felt the number of colors should match the number of planets, which at the time was seven.
RGB Color Scheme - Red Green Blue
How to represent the color of a pixel? The red/green/blue (RGB) scheme is one popular way of representing a color in the computer. In RGB, every color is defined as a particular combination of pure red, green, and blue light.
RGB Explorer
The best way to see how RGB works is to just play with. This RGB Explorer page which shows how any color can be made by combining red, green, and blue light.
RGB - Three Numbers
So essentially, any color can be encoded as three numbers .. one each for red, green, and blue.
| Color | Red number | Green number | Blue number |
|---|---|---|---|
| red | 255 | 0 | 0 |
| purple | 255 | 0 | 255 |
| dark yellow | 100 | 100 | 0 |
| white | 255 | 255 | 255 |
| black | 0 | 0 | 0 |
In RGB, a color is defined as a mixture of pure red, green, and blue lights of various strengths. Each of the red, green and blue light levels is encoded as a number in the range 0..255, with 0 meaning zero light and 255 meaning maximum light.
So for example (red=255, green=100, blue=0) is a color where red is maximum, green is medium, and blue is not present at all, resulting in a shade of orange. In this way, specifying the brightness 0..255 for the red, blue, and green color components of the pixel, any color can be formed.
Pigment Note -- you may have mixed color paints, such as adding red and green paint together. That sort of "pigment" color mixing works totally differently from the "light" mixing we have here. Light mixing is, I think, easier to follow, and in any case, is the most common way that computers store and manipulate images.
It's not required that you have an intuition about, say, what blue=137 looks like. You just need to understand that any color can be made by combining the three color values.
Image Diagram with RGB

Theme: Digital Atomization
We started with a whole image, and reduced it to a big collection of small elements. This a common theme in computer science -- what looks like an organic complicated whole, is "atomized" in the computer ... made up of a very large collection of very simple elements.
So we can start with a whole, textured digital image of something. Then break it down into small square pixels. Then each pixel breaks down to 3 numbers in the range 0..255. This is a typical computer pattern -- something whole and organic is, if you look behind the scenes, is broken down and represented as a lot of little numbers.
Image Code
In this section, we'll look at simple code to load and manipulate a digital image. Here we'll just manipulate one pixel at a time. In the next section, scaling up to operate on thousands of pixels at a time.
x.png
The image "x.png" is very simple -- it's a very small black square with a white "x" at its center. PNG (Portable Network Graphics) is a image format, like JPG. Here is x.png: 
x.png Code Example
Our first image code example loads the x.png image and prints it. Run the code to see what it does. Try changing the image.setZoom(20) to use the number 10 or 30 instead.
|
|
pixel.setRed(255) Example
|
|
Pixel Set Red/Green/Blue Functions
Aside: Image Functions Reference
For later reference, there is a separate image functions reference page which lists in one place the image functions such as pixel.setRed(number) we are using here.
Experiments On Pixel (0, 0)
To see how image.getPixel(x, y) and pixel.setRed(number) etc. work, we'll try the experiments listed below (use the "show" button to see the solution code).
|
|
| Example Problems | Solution |
|---|---|
| Set pixel (0, 0) to be green. | |
| Set pixel (0, 0) to be yellow. | |
| Set pixel (1, 0) to be yellow. Where is that pixel? | |
| Set pixel (0, 0) to white. | |
| Set pixel (0, 0) to be dark yellow -- set the necessary colors to 150 instead of 255. | |
| Set pixel (0, 0) to be a light, pastel red. |
Image For-Loop
In this section, we'll look at the "for loop" construct, which can run a bit of code thousands of times -- a big increase in the power available to us.
Accessing one pixel at a time, e.g. pixel at (0, 0), then the pixel at (1, 0), etc. is not a good way to work on an image which may have 100,000 or more pixels. We'd like to say something like "for each pixel do this", and let the computer fiddle with the details of going through all the (x, y) values to look at each pixel once.
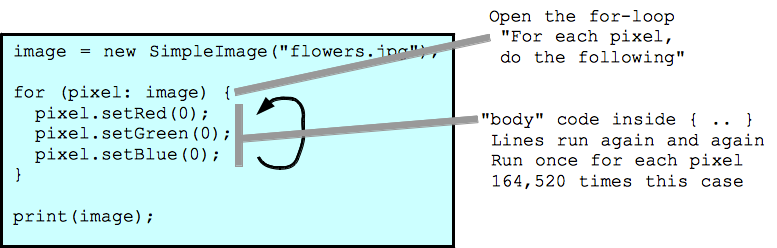
The very powerful "for loop" structure we'll learn here provides exactly this "for each pixel do this" feature. The loop takes a few lines of our code, and runs those lines again and again, once for each pixel in the image.
For-Loop Structure
For-Loop Example 1
Setting red, green, and blue all to 0 (for 164,520 pixels). What does that do? What if we set red, green, and blue all to 255?
|
|
For each pixel, the body code sets the red, green, and blue values all to be 0. The result is a pure black rectangle. None of the original flower data is left; it all got changed to zeros.
For-Loop Example 2
|
|
Result is a solid yellow rectangle. The code overwrites the flower data, changing each pixel in the original image into a pure yellow pixel.
For-Loop Example 3
Look again at flowers.jpg.Yellow is made or red + green, so we know that the yellow parts of the image have high red and green values. So what happens if, for each pixel, we set red to 0? What are the RGB values for a typical pixel on the yellow flowers look like before this loop runs? What about after?
|
|
The body code pixel.setRed(0); is run by the loop again and again, once for each pixel in the image. Since the yellow flowers are made with red + green light, setting the red to 0 for each pixel results is greenish flowers. The green leaves aren't changed much, since their red values were near 0 anyway.
For-Loop Example 4
|
|
Setting green and blue to 0 everywhere, all that is left is the area of red light that went into the original image, aka the "red channel" of the image. The red light is most prominent for the area of yellow flowers, which makes sense as we know that yellow = red + green.